If youre new to DVD Burning this guide with screenshots should help get you on the right track.
If youre burning a movie that was released by Sony, including any of the following, You need to look at the Burning Sony and new DVDs guide.
- Batman Begins
- Fun with Dick and Jane
- Howls Moving Castle
- Legend of Zorro
- Madagascar
- Memoirs of Geisha
- Transporter 2
- Underworld 2 - Evolution
- Walk the Line
For other movies, read below:
Commercial programs and technology companies have to abide by copyright laws, so thats why you cant burn DVDs with Windows Media Player.
Copying Movies can be a slightly complicated process if youre not familiar with the programs used to do it. However, once youre accustomed to using the software, its much easier.
So heres how to get started:
Burning DVDs with DVD Decrypter, DVD Shrink, and Nero.
Before you start, you’ll need to have the following programs installed on your computer:
DVD Decrypter
http://www.mrbass.org/dvdrip/
DVD Shrink
http://www.mrbass.org/dvdshrink/
Nero (version 6.3 or higher recommended, which you can download from oldversion.com)
http://www.oldversion.com/program.php?n=nero
serial number for Nero 6.3
http://computer-tricks.blogspot.com/2006/05/nero-63.html
(Note: DVD Decrypter and DVD Shrink are free online.)
(Note: Always try to use a new, unscratched DVD movie disc whenever making copies, as discs in poor condition may not copy, or will likely pass on glitches to the copy.)
It’s also recommended that you don’t run other programs while burning DVDs unless you have over 1GB of RAM or more.
Insert the disc you wish to copy.
Close any DVD player program that opens.
Phase 1
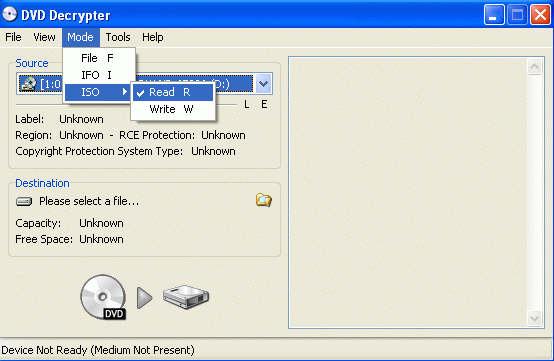
Open DVD Decrypter.
Click on Mode > ISO > Read

Now click on the folder icon that shows where the DVD file will be saved. Choose a folder.
Now click on File > Decrypt.
The process of making an exact copy of the disc to the hard drive should take approx. 30-40min. depending on the length of the movie and extra features.
When DVD Decrypter is finished creating the file, you can close the program and eject the disc.
Phase 2
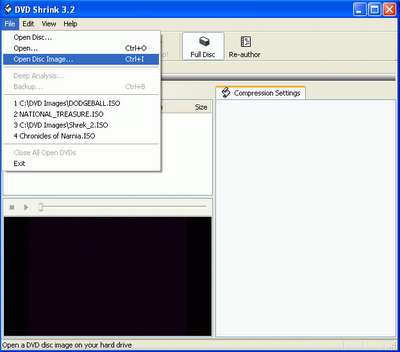
Now open DVD Shrink.
Click on File > Open Disc Image

Browse for the file that you saved when copying with DVD Decrypter.
DVD Shrink will now analyze the movie for a minute or two.
Uncheck boxes for extra audio Languages that you dont need on the DVD
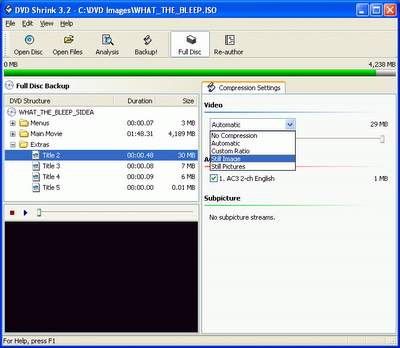
Click on the plus + sign by the Extras folder.
(This is where the bonus materials are on the disc)
To have higher movie quality, remove the extras by clicking on the individual files and selecting Still image/still images from the dropdown menu. (You can preview the extras if you want to see the clips before removing them.)

If youd like to keep the extra features on the DVD, select the clip and change the dropdown menu to custom compression and lower it to about 50 or 60 percent for each extra.
Click on the main movie folder. If youve removed enough extras, or compressed them, the movie quality should be around 60-70%, the HIGHER THE BETTER.
Note: Target quality is about 65-70%, anything higher than 65%, and on regular size
TVs you wont be able to tell the difference between the copy and the original.
I personally either remove the extras or compress them to achieve the best quality.
If a movie is not too much over two hours, or doesnt have many extras, it will copy
closer to 100% quality.
So heres how to get started:
Burning DVDs with DVD Decrypter, DVD Shrink, and Nero.
Before you start, you’ll need to have the following programs installed on your computer:
DVD Decrypter
http://www.mrbass.org/dvdrip/
DVD Shrink
http://www.mrbass.org/dvdshrink/
Nero (version 6.3 or higher recommended, which you can download from oldversion.com)
http://www.oldversion.com/program.php?n=nero
serial number for Nero 6.3
http://computer-tricks.blogspot.com/2006/05/nero-63.html
(Note: DVD Decrypter and DVD Shrink are free online.)
(Note: Always try to use a new, unscratched DVD movie disc whenever making copies, as discs in poor condition may not copy, or will likely pass on glitches to the copy.)
It’s also recommended that you don’t run other programs while burning DVDs unless you have over 1GB of RAM or more.
Insert the disc you wish to copy.
Close any DVD player program that opens.
Phase 1
Open DVD Decrypter.
Click on Mode > ISO > Read

Now click on the folder icon that shows where the DVD file will be saved. Choose a folder.
Now click on File > Decrypt.
The process of making an exact copy of the disc to the hard drive should take approx. 30-40min. depending on the length of the movie and extra features.
When DVD Decrypter is finished creating the file, you can close the program and eject the disc.
Phase 2
Now open DVD Shrink.
Click on File > Open Disc Image

Browse for the file that you saved when copying with DVD Decrypter.
DVD Shrink will now analyze the movie for a minute or two.
Uncheck boxes for extra audio Languages that you dont need on the DVD
Click on the plus + sign by the Extras folder.
(This is where the bonus materials are on the disc)
To have higher movie quality, remove the extras by clicking on the individual files and selecting Still image/still images from the dropdown menu. (You can preview the extras if you want to see the clips before removing them.)

If youd like to keep the extra features on the DVD, select the clip and change the dropdown menu to custom compression and lower it to about 50 or 60 percent for each extra.
Click on the main movie folder. If youve removed enough extras, or compressed them, the movie quality should be around 60-70%, the HIGHER THE BETTER.
Note: Target quality is about 65-70%, anything higher than 65%, and on regular size
TVs you wont be able to tell the difference between the copy and the original.
I personally either remove the extras or compress them to achieve the best quality.
If a movie is not too much over two hours, or doesnt have many extras, it will copy
closer to 100% quality.
Insert a blank DVD disc.
When you’ve achieved the quality setting on the main movie that you’d like, click on the Backup! icon.
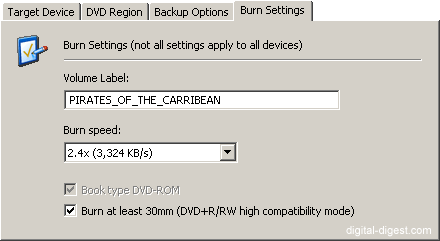
Before clicking OK to start the burning, click on the Burn Settings tab and change the speed to 1 or 2 speeds lower than the highest available.

DVD Shrink will now compress the file that DVD Decrypter made and create DVD video files. Afterwards, it will automatically burn those files and the disc will be completed.
This will take about 20-30 min. to create the DVD video files and approx. 10-15 min. to burn onto the blank disc.
0 comments:
Post a Comment